
I grew up with a sewing machine so starting and ending a seam with backstitching is second nature to me. When I got my first serger I was dumbfounded to learn that sergers don’t go backwards.
If you can’t go backward how do you keep a serged seam from unravelling?
At first I tied knots in the threads at the end of my serged seams, but that took FOREVER! Not to mention that sometimes the threads weren’t long enough to tie, sometimes I accidentally unravelled some of the seam, and sometimes the knots came loose.
There’s got to be a better way of starting and ending a serged seam!
Sew and Sew to the rescue! The nice ladies of Sew and Sew where I got my sewing machine and serger showed me the secrets of starting and ending serged seams that won’t unravel.
Starting and Finishing a Serged Seam – a Short Tutorial
Since the nice ladies didn’t swear me to secrecy I don’t have any qualms about showing you what I learned.
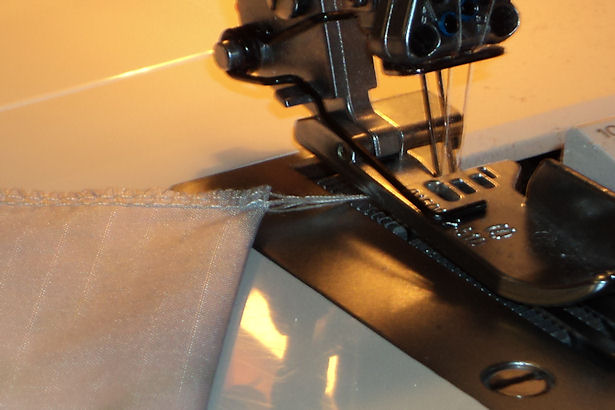
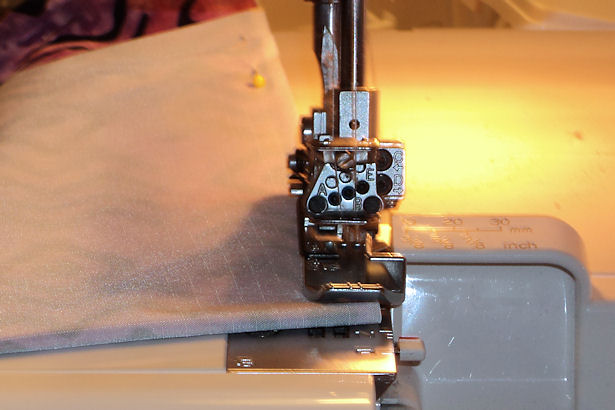 To secure the beginning of a serged seam, start about an inch from the edge of your item and serge toward the edge.
 Stop when the needles are just over the edge of the fabric.
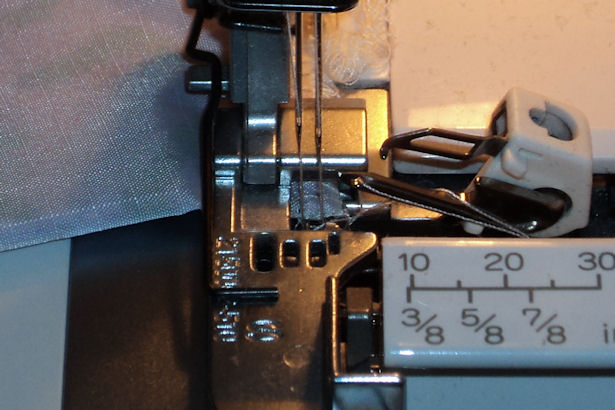
 Release the presser foot and pull gently on the item just enough so there’s enough room to
 pivot flip the fabric. Don’t worry if some of the loops hang off the edge of the fabric like mine did; they’ll be serged over when we go the other way.
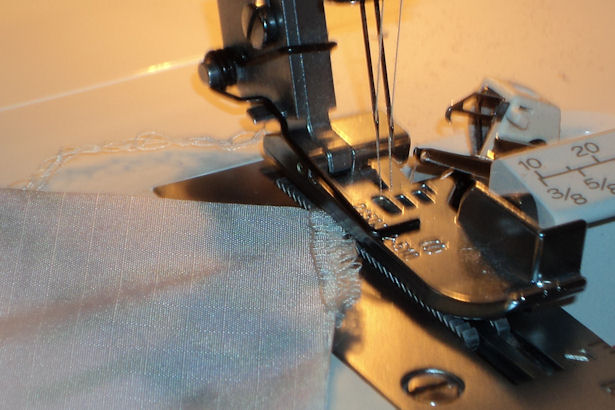
 Realign the fabric so you’re starting at the beginning and are headed toward the center of your seam. Serge as you would normally, stitching over the first inch of serging. See? Those loops are no problem anymore.
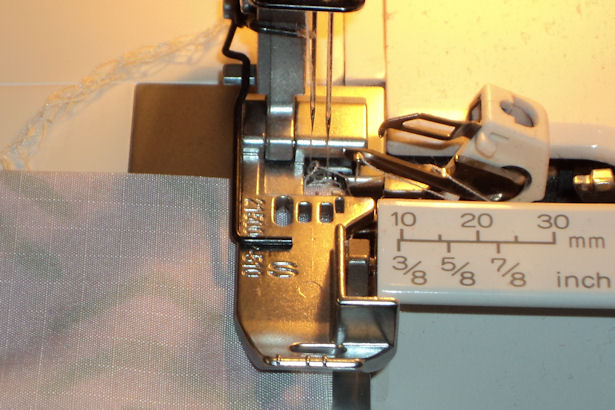
 When you get to the end of the seam, stop just over the end of the fabric like you did before.
 Pull the fabric gently and pivot…
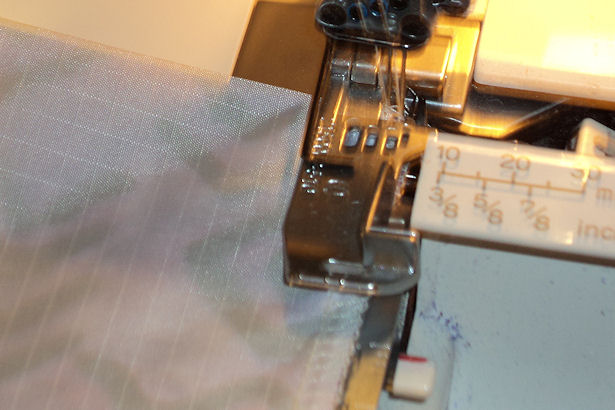 Then realign so you’re serging toward the center of the seam again. serge for about an inch before carefully serging off the edge of the fabric. You can trim the ends of your thread – no knots necessary!
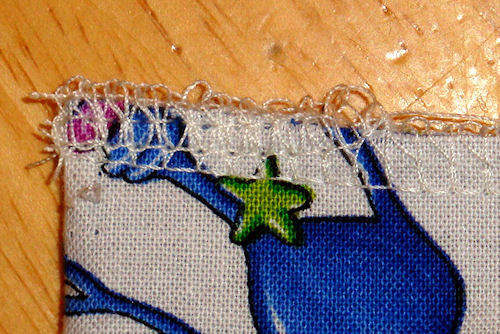 This is what the finished seam will look like – note the two layers of serging on top of each other.
Photo from my Make a Reusable Snack Bag tutorial – it’s better than the one I took for this tutorial. 😉
Now you know the secrets of starting and finishing a serged seam – I hope you found this tutorial helpful. Send me photos of the creative items you make with your serger, I’d love to see them!


Hi, thanks so much for this great tip – much quicker than finishing ends with a needle, which is what I’ve been doing.
Thanks again.
Debbie
Debbie,
You’re very welcome! I’d been tying the ends in a knot until I learned this technique. 🙂
Thanks for commenting!
~Amy Sue
just bought serger and went to comp for help and your way sounds good when i get back up to serg i will try it. hope it works for me
you wanted to know about our projects….. well i have a daughter who buys vintage clothes and some of them need sewing help. so thank you
Patti,
I hope the technique works for you! It takes a little getting used to, and is nowhere near as easy as backstitching on a sewing machine, but it sure beats hand-tying knots!
Thanks for commenting!
~Amy Sue
Thanks Amy Sue, I’ve been tying knots too and getting frustrated witht he untidy finish and time consuming task! I’ll give this a go. Thansk for sharing 🙂
Merrill,
I hear you! However in my limited experience it’s easier to do this technique when you’re doing longer seams. When I do shorter seams, like 2″ and under, the fabric slides too much and is hard to turn. So those I still tie by hand.
Good luck, and thanks for commenting!
~Amy Sue
If the work is going to the sewing machine as the next step, what are your thoughts on folding the chain over and tacking it down onto the serged seam?
Been working exclusively with a Pfaff 1197 and just got my hands on a Singer 14U34B serger. It serges very well, but the dangling chains are much too messy for my taste. Most of my work is rather small as well, lots of short and curved seams.
Todd,
You mean stitching the chain down with the sewing machine? I would think that would work too – the idea is to keep the chain from unravelling. For my trifold diaper inserts I fold the chain over and zigzag stitch over it to tack it down.
I agree that the dangling seams are messy – they drive me crazy! Do you serge your woolies? The small leg holes would drive me nuts, but I grew up sewing so serging isn’t as instinctive for me.
Thanks for commenting!
~Amy Sue
Thank you so much for this tip!! I’ve been reluctant to use my serger very much on account of having no way to secure the ends. I’ve tried fray check as well as tying knots in the ends. The only other method I’ve been able to find was explained so confusingly that I just didn’t “get” it. I’m so thankful to you for posting this method!
Lee,
You are very welcome! I was so excited to learn this technique too, since I’d been tying knots in the ends of all my serged seams until I learned this trick. This is SO much faster!
Thanks for commenting,
~Amy Sue
THANKS SO MUCH for this tip – perfect for what I am making and it’s so much easier than fiddling with tacking down, fray check etc…I played with some sample fabric – figured it out and now each one is just awesome!
Michelle,
I felt the exact same way when I learned the trick!
Thanks for commenting,
~Amy Sue
Love this idea! I did learn this in a beginning serging class and no one explained…unless I missed it what to do with the messy loops and whether I am to just serge over them? I have some circle projects so have to join the serged edges, when I do them it looks like I have to make sure I’m not re-cutting the material, but go over the original serged edges. This make sense?
Katherine,
I’m not sure which “messy loops” you mean – if you do it right there shouldn’t be any extra loops at the point where you pivot and go the opposite way. Not that I always do it right; I’ve had unintended loops there more often than I want to admit, LOL!
But When I do get loops at the pivot point, here’s what I do:
– If there are just a couple I ignore them and try harder not to have any the next time. 😉
– If there are a lot I cut the threads, tie them into knots, then trim the ends.
– If there are too many to ignore but not enough to tie into knots I’ll zig-zag them down with the sewing machine.
If you mean the loops at the very end when you’re done pivoting and serging the opposite way, you can pull the thread end gently to tighten the loops, then cut them off. If you want to be double-dog sure that they don’t unravel you can tie the ends into a knot before cutting, but the whole idea of this technique is so you don’t have to tie those silly knots.
I hope this helps! If I’m not “getting” what you mean, send me a photo so I can see exactly where your loops are. 😉
Thanks for asking,
~Amy Sue
by pivot do you mean flip?
Yes, FLIP is a much better word – thanks!
Amy Sue recently posted…Oh No – I Killed the Kitten!