
The first appliques I ever made were on stockings “Mrs. Claus” made for College Boy, Princess and Angel Face. I didn’t know anything about applique, but I stumbled along and managed to do a fairly decent job.
Since then I’ve ahem… “Mrs. Claus” has made stockings for Jo-Bear, Z-Man, Little Guy, and Teacher. And grandmas, grandpas, aunts, uncles, cousins, you name it. I think the only ones in our family who don’t have an appliqued stocking yet are Great Grandma and me – go figure!
I loved applique so much that I started making appliqued diapers… but that’s a story for another time. The point is that over the years I’ve made a LOT of appliques and learned a LOT about how to applique. Now I’d like to share that knowledge with all of you. Don’t be scared – if you can sew, you can applique! Besides, I’ll be with you every step of the way and if you run into problems you can contact me. So grab your fabric scraps and put on your creativity hat – you’ll be surprised how easy and addicting applique is!
Supplies
Obviously you’ll need basic sewing necessities like a sewing machine, scissors, thread, needles, pins, etc. In addition, you will also need:
- A regular pencil
- Plain or tracing paper
- An iron
- A water or air soluble marking pen or pencil
- Paper backed iron-on adhesive, like Heat n Bond™
- Tear away stabilizer, standard type
- Fabrics for the applique, prelaundered as the finished product will be laundered.
How to Applique – Step by Step
I did my best to explain each step thoroughly, but feel free to contact me if you’re confused about something.
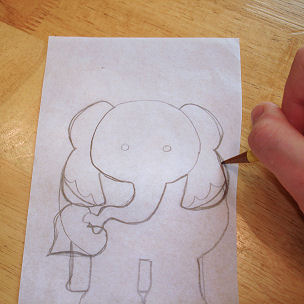
1. Draw Your Applique Design
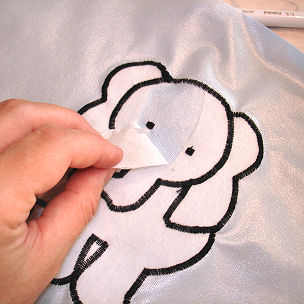
The first you need is a design to applique. A simple design with straight sides is easiest for beginners, so consider starting with a block, kite or star. If you’re an experienced seamstress you may want to try a design with curves, like a heart or balloon. I’m working on one of my elephant designs in the examples.
Either draw your design on the plain paper, or trace the design onto the tracing paper. Keep in mind that the finished applique will be a mirror image of your tracing.
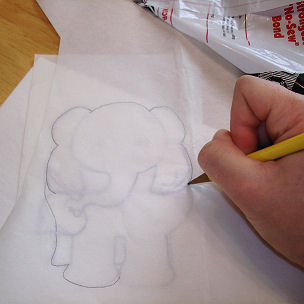
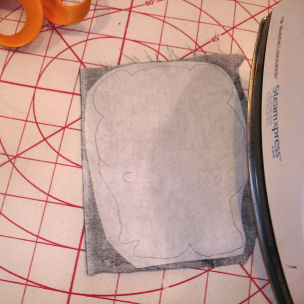
2. Trace onto the Iron-On Adhesive
Place the iron-on adhesive on top of your design, paper side up, and trace your design onto the adhesive. If your design is made up of more than one element, like the elephant and heart, you will need to trace each section separately.
If there are sections next to each other, you need to decide which will go on top of the other. When tracing, extend the line of the bottom section about 1/4 inch where it touches the top one. This will allow you to layer the sections so there won’t be any gaps in between them.
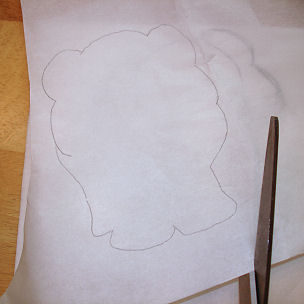
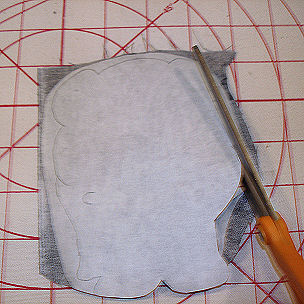
3. Rough Cut the Design
After your design pieces are traced, you need to separate them from the rest of the adhesive. Cut around your tracing lines, about 1/2 to 1 inch away from the lines.
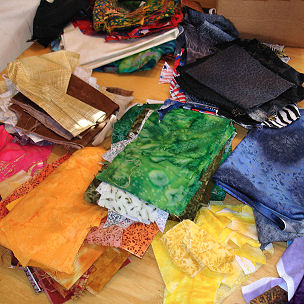
4. Choose Your Fabrics
This is one of my favorite steps – choose the fabric for each section. To make selecting easier I separate my fabrics into color families. Cotton woven fabrics are the easiest to work with, although you may want to experiment with other fabrics as you gain experience. Beware of fabrics that fray because they often shred when laundered, and thicker fabrics like corduroy or velvet may be too difficult for some machines to handle smoothly.
5. Fuse the Fabric to the Adhesive
Heat your iron according to the directions that came with the adhesive. When the iron is hot, place the preshrunk fabric right (front) side down on your ironing surface and press to remove any wrinkles. Be sure to put the side you want to use face down so you’re looking at the back of the fabric. Double and triple check before ironing – I can’t tell you how many times I wasn’t paying attention and fused the adhesive to the front of my fabric! Place the adhesive, paper side up, on the wrong (back) side of your fabric. Fuse according to the directions that came with your adhesive.
6. Cut out the Sections
Cut out each section, following the tracing lines carefully.
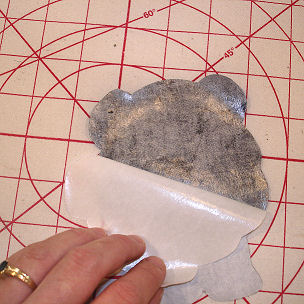
7. Remove the Adhesive Backing
Carefully peel the paper backing from the iron-on adhesive. If the backing is difficult to separate from the adhesive, tear the edge of the paper a little to get things started, or use a fingernail to separate the paper from the fabric.
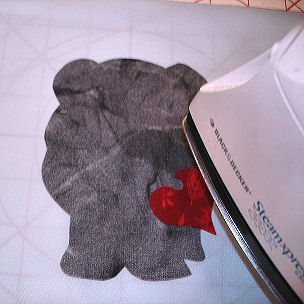
8. Iron the Applique to Your Item
Place the applique, adhesive side down, on the item you’re going to apply it to and arrange the sections to match your pattern. If you have several pieces you may need to look at the pattern to remember how the sections fit together. When the applique looks the way you want it to, iron it down according to the directions that came with the adhesive.
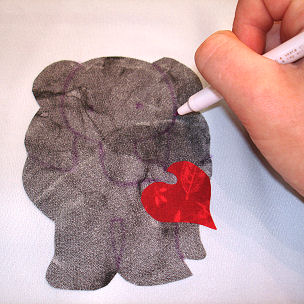
9. Add Some Details
Using the water soluble pen or pencil, draw in any details you wish to add to the applique.
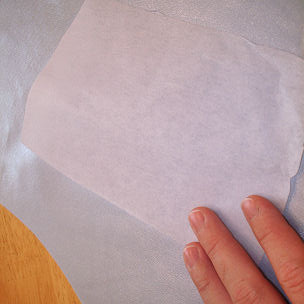
10. Stabilize with Interfacing
Cut a piece of tear-away interfacing large enough to cover the entire applique with a border of about 1/2 – 1 inch. Place the interfacing on the wrong side of the item you’re appliquing, under the applique. Now this part is a little tricky – holding the interfacing tightly, flip the item over and pin the interfacing on from the front. (You can see a pin in my next photo) If the item you’re appliquing is thin enough, you hold it up to a light to make sure the entire applique has interfacing behind it. If the item is too thick to see through you’ll have to check by feel.
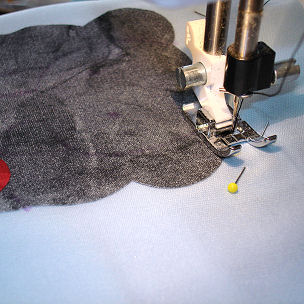
Now comes the fun – stitching! Use a Satin stitch if your machine has it, otherwise use a Zig Zag stitch and decrease stitch length until the threads are sewn right next to each other. Most sewing machine manuals recommend loosening the top thread tension for applique work, but be sure to check your own machine’s manual for directions. Using a scrap piece of fabric, experiment with stitch width and length until you find an effect you like. You want the thread to go into the applique fabric on one side and into the background fabric on the other, so the raw (unstitched) edge of the applique is completely encased in thread. On my Viking I generally use a stitch length of .3 and a width of 3.5, but each machine is different so these numbers may not work for you. Once you find the stitch length and width you like, write them down somewhere so you don’t forget – the owner’s manual is a good place. Unless you tend to lose them like I do.
Line the applique up so the raw (unstitched) edge is in the middle of your presser foot and start stitching. Go slowly at first, until you gain some confidence. Slow down as you approach a curve or corner so you don’t overshoot the edge. There are several ways to turn corners; try different ways until you find one that works for you. The way I round a corner is by stitching to the end of the fabric until the thread is even with the bottom edge of the fabric. Then I sink the needle in the very outermost point of the corner, where the two sides meet. Raise the presser foot, leaving the needle sunk into the fabric, and pivot the fabric to the right so the raw edge is lined up in the middle of the presser foot. Lower the presser foot and continue sewing.
Curves are easier than corners, and wide curves may not require any pivoting. Stitch wide curves slowly so the stitches remain even. Sharp curves may require a pivot to keep the raw edge in the middle of the presser foot. When stitching an outer corner, like the outside of an O, stop with the needle down on the background fabric, then pivot just enough to line the raw edge up. When stitching an inner corner, like the inside of an O, stop with the needle down in the applique fabric and pivot just enough to keep the raw edge in the center of the presser foot.
Remember to stitch the details you marked earlier. I generally narrow my stitch width by one setting for inner details. Remember to backstitch whenever you begin and end stitching so your stitching doesn’t come out later. I realize this photo doesn’t show the raw edge in the center of the presser foot – I was about to pivot around the curve when I took the photo. See the pin holding the interfacing to the background fabric? Since taking this photo I’ve moved my pins to the edge of the applique so there aren’t any holes in the PUL.
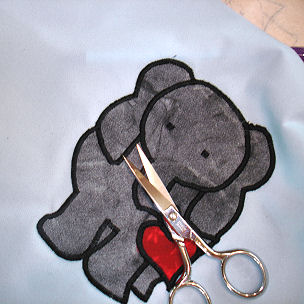
12. Trim the Threads
Wen you’re all done stitching carefully trim the loose threads as close to the fabric as you can without cutting the fabric or stitching. I trim the font first because any tiny ends are usually pulled to the back when I grab those threads to trim them. Using a small, sharp scissors makes it easier to trim closely.
13. Remove the Interfacing
Remove the interfacing by tearing along the stitching. Your needle will have perforated the interfacing so it should come away fairly easily. Use a fingernail along the stitching to get things started, but do not use your scissors or anything sharp as it might poke through the applique. Don’t ask how I know this, it’s a tragic memory.


Is “Mrs. Claus” going to make Erin a stocking, too?
Depends, is she on Santa’s Nice list or Naughty list?
I dunno. I’d have to ask the big guy myself.
BTW, I love that the button to leave comments says “Press me now.”
Do you have any problem with your needle gumming up and breaking the thread? If so whats the trick. Its really annoying.
Sometimes it collects a bunch of “goop” toward the top of the needle. When I see a gob collecting I pause and pull it off. Where does yours collect, by the eye or the top? (There’s probably a term for the end opposite the eye, but I dunno what it is.)
~Amy Sue
Wow!!!! I’m wanting to start learning how to do this and this is by far the most explanatory and easy to understand instructions I have found. Thanks so much for taking the time to do this!
thanks!!! easiest method ive found yett
I’m doing applique with double sided fusible web and then stitching around the edges with embroidery floss by hand. Do you have any suggestions for a way to cover the back of the applique so that the stitches and knots don’t irritate a baby’s skin? I was looking for a way to do interfacing on the back, but tear away wouldn’t really cover the knots. I was wodering what you thought about an iron on interfacing? Would it be even more rough feeling?
You could try an iron-on interfacing; most of them are pretty soft on the back, but it’s a toss-up whether it will stay on or not. I’ve had both commercial and hand-made items with iron-on interfacing and sometimes it stays on sometimes it doesn’t. There doesn’t seem to be a pattern as to which stays and which doesn’t.
It’s worth a try though, and if it falls off you can always iron another piece on. 😉
~Amy Sue
OK question~I made a shirt with my school’s name but I didn’t use interfacing should I? it was just a practice shirt so I’m not too worried about it~it’s at my blog if you want to check it out! Also, is there a way to embrodier appliques? I keep seeing this on sites and was wondering if I was missing something~thanks for the instructions!
Autumn, Do you mean interfacing behind the finished applique, like Melissa was talking about? If so, it shouldn’t make a difference as long as your stitching ends aren’t loose.
If you mean the tear-away interfacing from step 10 above, it could make a difference. The interfacing keeps the fabric from puckering as you’re stitching. If your shirt fabric has enough “body” you may be OK without it, but using it will give you a smoother-looking applique.
Embroidered applique is done with an embroidery machine, instead of by hand with a sewing machine. You can see a tutorial here.
Although embroidered applique is very pretty, I prefer the personal touch of hand-guided applique to machine-guided embroidered applique.
~Amy Sue
I don’t have a machine; can I finish the edges by hand? If so, what’s the name of the stitch I should use?
Yes, you can finish the edges by hand! If your applique is made from woven fabric it will ravel unless you turn the edges under. Some people like the shabby chic look of a slightly ragged edge, but if you don’t here’s what to do:
– Apply Wonder Under as above.
– Cut your applique piece about 1/4″ larger all the way around. This is easier to do with larger pieces and simple shapes.
– Leave the paper on the Wonder Under and carefully fold the 1/4″ allowance to the back.
– Press the edges with an iron so they’ll stay.
– Remove the paper backing from the Wonder Under, refold the allowance, and proceed as above.
– Instead of machine stitching, use an invisible stitch
Good luck!
~Amy Sue
Thanks, Amy Sue! What a big help! I’ll try the Shabby Chic look first, and if I don’t like it I’ll try the other method. If I use the Shabby Chic approach, I guess it doesn’t matter what stitch I use? It could be invisible, whipstitch, or blanket stitch?
You’re welcome Debbie! If you’re going for the shabby chic look I’d do either a blanket stitch or a plain “running” stitch. You know – up/down up/down along the edge. Be sure to show off pics when you’re done!
~Amy Sue
Can I iron on an applique onto an already finished AIO or pocket diaper? The material would be PUL. Want to make sure that the heat of the iron won’t warp or damage the PUL on the diaper. Thanks! -Cynthia
I haven’t ever tried ironing an applique on a finished diaper, but I do iron mine on PUL diaper cuts. You need to keep the iron moving and try not to iron over any more of the PUL than you have to. An iron that is too hot or left in one place too long can cause the PUL to shrink slightly and wrinkle up, or even to melt.
I wouldn’t advise ironing an applique onto a finished diaper unless you have some way to sew it on also. Appliques that are only ironed on won’t stand up to the vigorous washing that most diapers receive.
~Amy Sue
Thanks for a wonderful tutorial, this is just what I was looking for! My PUL melted on the first try, but I’ll keep working to perfect it. Thanks again!
Ok, I didn’t melt the PUL! And instead of using the tear away stabilizer, I used a piece of PUL in an effort to keep it from leaking (plus I didn’t have the stabilizer on hand either :oP). I put the wrong sides of the PUL together. It worked great for doing the applique, but it leaks. Any tips?
Perhaps my leak test wasn’t “true to life” (I pressed a wet cloth against the back of the applique, lightly, and there was a perfect wet outline of my applique on my cloth underneath :o( ).
Well, I’m having fun doing appliques though, something I’ve always meant to try, and your tute made it simple! Thanks again!
Chantelle,
Using a second layer of PUL will only prevent leaking if you don’t sew through it – if you sew through both layers it’ll still leak because the needle holes will go through both layers. Keep trying until you find the technique that works best for you!
~Amy Sue
What is the difference between applique and embroidery?
Audi,
That’s a great question! There are several major differences between applique and embroidery. Embroidery designs are usually stitched by an embroidery machine using threads in different colors. As I understand it, once the design and threads are selected and the machine is all set up you just need to start the machine and keep an eye on it – it sews the design pretty much by itself. Applique designs are made from fabric pieces that are stitched around the edges with thread, and can be done on a regular machine. Applique is generally more “handcrafted” because even though a sewing machine is used, the machine must be guided by hand.
I hope this helps,
~Amy Sue
Amy Sue,
Thanks so much for your instructions. I have been doing applique for several years, myself. I am experiencing problems with the edges coming lose after several washing. I really can’t figure out what I am doing wrong. Maybe I am using the wrong brand of fusible. I think one time I might not have used any fusible on the squares I was placing on a purse but I do use a stabilizer on the back (tear away) and front (dissolved with water) and the squares still came loose. Any ideas would be greatly appreciated.
Thanks,
Kari
These are the most easy and well illustrated instructions I’ve found online. Thanks!
Kari,
I use the heavy duty “no-sew” fusible and sew through it. I’ve found that their idea of no-sew and my idea of no-sew aren’t the same; I want my item to stay on no matter what and if I don’t sew it won’t.
How are you sewing your applique – straight or satin stitch? If you’re doing a straight stitch the edges probably will come loose over time and use. That’s why I prefer to use a satin stitch, unless you’re going for a shabby chic look.
Stabilizer won’t help the applique stay on the item; it just makes the sewing easier and keeps the stitches smoother.
I hope that helps! Feel free to post any other questions!
~Amy Sue
I was wondering if sewing the appliques on PUL makes YOUR diapers leak? I’m only asking because I want to make an appliqued diaper, but I don’t want it to leak either. Thanks!
Christina,
Any stitching through PUL can cause it to leak: applique, embroidery, elastic casings, etc. I put an extra layer of PUL behind all of my appliques so they don’t leak. Some WAHMs iron an extra piece to the inside, shiny sides together, but I haven’t had consistent results with this so I cut my PUL big enough to catch in the seams.
Be sure to post a link showing off your appliqued diaper when it’s done, I’d love to see it!
~Amy Sue
Hi Amy…I finally got around to making my appliqued diaper! I think it turned out great for my first one. I got a litle over-zealous and decided I wanted to do 8 mo old DS’s handprints…I messed up a little on the left hand but the right one turned out much better. I think it turned out super-cute overall!
I also borrowed your idea of using another piece of PUL to back the applique…it worked great!!!
Here’s the link so you cam see my completed diaper http://i17.photobucket.com/albums/b85/AteManager/Diapers/newPicture130.jpg
Thanks for the WONDERFUL tutorial…you made it super easy to learn!
Thank you for a GREAT tutorial!!! I was told by my MIL that tissue paper works just as well as tear-away stabilizer. Has anyone tried tissue paper? I’d like to try appliqueing this weekend but I don’t feel like driving an hour to Joanns for stabilizer.
Fantastic instructions and have attemtped to do some but am having problems with the needle holes left around the edge of the applique!!!! I am using a Sharps # 8 needle and have changed from a loose thread count to a denser thread count but still have the needle holes!!!! What am I doing wrong?
Cheers
Syl
Freezer paper works well. Just iron it on, sew, then tear it away.
Thank you so much … That’s exactly what I wanted to do but wasn’t sure how to …
Just to be sure I understand …
If I do not use interfacing, I must put a second layer of pul. If I put the interfacing, I do not need to put another layer of pul … Is that correct? I’m afraid of leaks.
Julie
Ok, I think I understand … I need to put a second layer of pul … so it would not leak … thank you again!
When you applique do you use embroidery thread as if you are embroidering.
Thanks Debbie
Debbie,
I use plain old Guttermann poly thread, like I’d use for sewing clothing. Embroidery thread may work for some projects, but I’m usually working with children’s clothing which needs a thread that will hold up to lots of laundering.
~Amy Sue
Hi Amy Sue,
My name is Cindy and I have been trying to teach myself how to applique. I googled how to applique and found your website. You don’t know it, but you have taught me a lot. Several things I was trying unsuccessfully to figure out you explained to me. However, I am making the ugliest corners you have ever seen and I wondered if maybe some how you could teach me. I am using a zig zag stitch and my pivoting leaves a lot to be desired. I have been sitting at my machine for two days trying to make a pretty rounded corner. I promise I have been trying your suggestions with the fabric in the middle of my pressure foot and I have tried over and over, but ugliness prevails. Is it really this difficult? I refuse to give up and I am hoping my
e-mentor can help me. Thanks for all your help. I appreciate all the time you have put into your website, it is beautiful and informative!
I just reread my post and I think I sound confusing. In your example you used an O. That is exactly what I am trying to zig zag around. You already helped me master a square corner!!!
Cindy,
Sewing curves is hard! It takes lots and lots of practice – you should’ve seen some of my first attempts. (Or maybe not!)
Go very s-l-o-w-l-y; I sometimes do one stitch at a time in really tough places to make sure the thread is going where I want it to. Try to keep the stitches on the outer curves evenly spaced, even if it means the inner curve stitches are closer together or overlapping.
If it’s a really tight curve you can try to have two or three inner stitches meet in the same place.Imagine sewing an asterisk (*) the outer stitches would be evenly spaced out but the inner ones would all meet in the same place in the center. I hope that makes sense – it’s much easier to do than to explain, LOL!
I hope that helps! Feel free to ask again if something wasn’t clear!
~Amy Sue
i was wondering if you can show a link to applique a tulip i figured out your technique but my pastel colors are backwards how do i do it to make them show on the front side of a dark color thanks fustrated email me plzzzzzzzzzzzz
Lori,
What do you mean your pastel colors are backward? The wrong side of the fabric is showing, or the left colors are on the right?
If it’s a problem that the background color is showing through you may need to add a layer of white fabric in between. To do this, trace the outline of your entire applique – not each piece, the whole thing – on fusible webbing. Fuse it to white fabric, cut it out, then fuse it to the background fabric where you want your applique to be. Then fuse your applique on top of the white fabric.
Let me know if that’s not what you meant, or if it didn’t make sense.
~Amy Sue
How do I applique on a heavy sweatshirt? I’m having trouble with the stitching.
Marsha,
What kind of trouble are you having with the stitching? Do you have a heavy tear-away interfacing in back? Maybe try lengthening your stitch, so they’re not so close together. If you’re able to change the pressure of your pressure foot you may need to raise it a little so it’s not pressing so hard on the thick fabric.
I hope this helps!
~Amy Sue
i am appliqueing pillow cases I have used the light heat and bond and my machine skips stitches and the thread breaks, I’m trying wonder under, I don’t like it as much my stitching seems to pull away from the side?
I’m not sure what I’m doing wrong
any suggestions
Kim,
The first thing I do when my machine skips stitches is to put in a new needle. If that doesn’t help take the thread and bobbin out and rethread them. If it’s still skipping stitches your tension might be messed up. Check out your owner’s manual to see what number your machine’s tension should be on – it may give a different setting for applique. Often I’ll loosen the top thread tension a little so the top thread is pulled underneath the fabric a little; it makes a smoother stitch.
I hope that helped!
~Amy Sue
Hi Amy Sue! I love making appliques, but when I try to make letter shaped appliques, for example, a “B”, its hard to stitch the edges because it looks meesed up going around sharp curves. i dont know if it is because my sewing machine isnt that fancy and only has one stitch that sews close enough together to use for the edging of my appliques… I have no idea. Can you please help?
Elizabeth,
Sharp curves are really difficult. The best thing to do is go really, really, really slow. Like even 1-2 stitches at a time, and move the fabric just a bit in between. If the curve is sharp enough you can have the needle use the same hole for the inside stitch while the outside stitch fans out. I hope that makes sense!
~Amy Sue
Hi Amy I asked the question above about the pillow case just wanted to add that I also used a tear away stabilizer, I’m not sure what I’m doing wrong, I’m using a zigzag stitch on 1
thanks Amy just wanted to give you more info
Kim,
What kind of fabrics are you using for the background and the applique? Are any heavy ones like denim or corduroy? Does your machine sew fine otherwise? Maybe it just needs a tune up.
I don’t know how wide “1” is on your machine – does it make a difference to make the stitch wider or narrower? Sometimes a machine just doesn’t like a particular setting for no reason. Mine cops a ‘tude sometimes, then I threaten to trade it in if it doesn’t shape up. 😉
~Amy Sue
My machine is new I just took back one last week because I thought maybe it wasn’t strong enough to sew through the heat and bond, so I’m not sure about the tension they told me to keep it on 4 so how do I know if I should make it looser or not. Both machines were skipping stitches, the zigzag stitch is close but not like a satin stitch, so I’m thinking it’s the heat and bond gooping up my needle, today I cleaned it after every letter I did, and it didn’t skip, but I haven’t tried adjusting the tension do i need to move it down. Sorry if this is confusing
oh and I use cotton on cotton
thanks kim
Hmmm… what does the owner’s manual say about applique? Does it give any special settings or hints?
It could be the heat and bond gooping up the needle. I often get a big fusible webbing/lint booger on my needle but it just collects toward the top and when it gets too big I pull it off. Could you try different needles in your machine? I use Schmetz Universal 70/10 for applique on cotton. I use the 70s because they’re a little smaller and leave smaller holes.
~Amy Sue
Hi Amy Sue
My book just says turn stitch and length dial to desired length, it does say tie top and bottom thread under the applique(how do you do this)?,I’ve just been trimming them closely like you say. I use an 80/12 I have a 70/10 that came with it I will try that today. I’ll let you know how it goes, I am going to try and make a soccer ball today wish me luck
thanks for your help
Kim,
If you backstitch and trim closely you don’t have to tie the ends on back. You could if you wanted to though… On the back give the thread end a gentle tug and look closely at the thread where it enters the fabric. Hopefully you’ll see the top thread coming through a little. Use a pin to coax the top thread to the bottom then tie the ends in a knot.
How did the soccer ball turn out? Tonight I’m working on the lace appliques on Princess’s wedding dress.
~ Amy Sue
Hi Amy Sue, it turned out cute, I’m not sure how to put a picture up, I’ll ask my husband. it didn’t mess up but I switched the needle and after a while it broke in half? I’m not sure why? so I went back to the 80/12, going to do a shirt next. Are you on facebook?
ok thanks for letting me know on the backstitch that is how I do it. Are you making her dress? I want to see pics.
thanks so much for all your help
Kim,
I can’t wait to see a picture! If you can’t get one up, email it to me and I’ll post it – with your permission, of course.
There’s so many reasons a needle could break. I broke one on the wedding dress the other night – somehow the bobbin cover plate moved out of position and the needle hit it. If your fabric is really thick and you’re sewing fast that’ll do it, or if you pull the fabric and the needle gets caught so it goes down crookedly that can do it too. Broken needles is just a part of sewing – it happens. As long as you find all the pieces so there aren’t any left in the project it’s not a big deal.
Yes, I’m on Facebook – Twitter too; I’d love to connect either or both of those places!
Facebook: My Happy Crazy Life
Twitter: HappyCrazyLife
I’ll get a couple sneak-peeks of the wedding dress tomorrow, hopefully. I was going to do it today but Angel Face took my camera to school before I could download the photos.
~Amy Sue
I’ll send you a picture and look for you on twitter and facebook, thanks for the tips so far I haven’t had any skipping, but like you said wheni see the build up I clean the needle.
gotta run errands so I’ll send a pic later today
thanks Amy Sue
Great, I can’t wait to see the picture!
You’re very welcome – I’m glad I could help. 🙂
~Amy Sue
k I emailed you a pic
need to work on the circle a bit but not too bad
thanks
kim
It looks good, Kim! Circles are really hard, I still have to go really slow and concentrate on them… and still end up “unsewing” sometime
May I have your permission to post your photo for everyone to see?
~Amy Sue
Hi! I’ve been reading messages here to try to find a solution to a problem I am having with my applique. My needed is getting “gummed” up from the adhesive on the Heat and Bond. Not just a lint type that you can remove….it’s actually sticky. It causes the thread to break and the stitching looks horrible because of so many stops and starts.
When I run the stitch on a peice of fabric without the Heat and Bond it does great. But I love using the Heat and Bond because of the smootness/non fraying. Any suggestions?
Lori
Hi Lori,
What size needle are you using? I use a Schmetz 70/10, I think. (I don’t have any right here to look at – it’s 70/something) It’s a finer needle than standard so it makes smaller holes than standard needles. My needle does get gummed up but I just pull the “booger” off every so often and usually the needle itself doesn’t get sticky. I replace needles after every 8-10 hours of sewing so maybe it doesn’t get a chance to get sticky?
I don’t now how large your appliques are, but maybe try cleaning the needle after each section? A warm, damp, terrycloth washcloth may do the trick, otherwise
you could try Goo Gone to remove the stickies – but be sure to clean the needle VERY WELL afterward because Goo Gone is oily and will leave a greasy stain on the fabric.
I hope this helps!
~Amy Sue
Thanks Amy Sue!!
I actually did try to goo gone and it worked well, and yeah, I even thought about cleaning the goo gone off the needle before beginning to sew again.
I’ll try a different needle…..that may be the trick.
Thanks!
Lori,
Good luck – I hope using a different needle works!
~Amy Sue
Amy Sue…..you are a genius!!! You saved my Easter!! I went and got a smaller needle and had no more clumping of glue or breaking of thread when appliquing!!! My Spring shirts came out looking great!
Thank you, thank you, thank you!!!
Woo hoo! I’m so glad we were able to figure it out! Now I’m dying to see your Easter shirts – pretty please?
~Amy Sue
i just started doing appliques this week. was so excited until i started sewing tonight! had everything set out with the appliques “ironed” onto the onesies. why is my machine putting holes in the fabric? i’ve ruined 4 items and i’m heartbroken!!!
Oh no Erica, how heartbreaking!
Which fabric is getting holes in it – the applique or the onesie? What kind of holes are they – holes from the needle or tears? What kind of needle are you using?
With knits, like onesies and t-shirts, it’s best to use a ball point needle instead of a sharp. Sharps sometimes pierce the threads and break them, causing small holes while with ball point needles the threads slip to the side and the needle goes in between the threads. You may have to experiment to see how well the ball point needle works on the applique though – it may not be sharp enough to go through several layers of fabric and fusible. For instance, if you’re doing a frog and have the pupil, eyeball, and frog face all stacked up you may need to go really slowly so you don’t break the needle.
Let me know about the holes so I can help figure out what’s going on.
~Amy Sue
Thanks Amy Sue! It is the onesie getting the holes, but I think I might have figured it was because I didn’t cut the fusing big enough. I had only cut it to be the size of the applique itself and not large enough for a “seam” allowance for the stitching of the applique. Do you think that might have been it? These were pretty small appliques (sailboat, alligator, initials), but I think I am going to attempt to salvage the garments by putting a large square / rectangle and applique over the ruined applique, and then just put a single initial in the middle. I don’t know if that will work, but it’s worth a shot. I can’t ruin them anymore than I already have ;). by the way, this is the best site with applique instructions, but I love all your other posts as well!
Erica,
The fusing shouldn’t be bigger than the applique because if it is it’ll melt all over your iron when you iron the applique to the onesie. Usually I fuse a piece of wonder under to the back of my fabric then cut out the shape, so the fusing is the exact same size as the applique.
Your solution sounds perfect! My mantra when I’m sewing is “I can fix it, I can fix it…” It’s amazing how creative one can get when necessary.
Good luck and be sure to send me a photo!
~Amy Sue
Pingback: Easy, Inexpensive Teacher Gift « SkyLane Designs
hi, i have to do a step by step guide on applique for textiles at school but i dont get the interface bit what is interface, do yo just turn over the edges so they dont look rough???
Kim,
Interfacing is a non-woven textile used on the back of fabrics to stiffen or strengthen an area of the fabric. For applique I use “tear away” interfacing which means that after you’re done sewing it you can tear it along the stitching lines to remove it.
You could turn over the edges if you’d like, but I prefer to satin stitch over them instead.
~Amy Sue
oh, and can you stitch your applique to the backing,in my case a cusion cover or do you have to use the iron on stuff?
hope you can help x
You could simply stitch the applique to the cushion cover, but using the fusible bond helps keep the applique in place while you’re stitching, and keeps the entire applique attached to the backing – otherwise you could get “bubbles” under the applique.
~Amy Sue
Thank you so much for this tutorial! I am wanting to start to do some appliques. Love the elephant dipe. Super cute!
Thanks for taking time to comment Alison! I hope the tutorial is helpful for you – send me a photo of your appliques, I’d love to see them!
~Amy Sue
I just wanted to say thank you for the applique tutorial! It is great! I can’t wait to try it out! Thanks!!!
Thanks Tracy! I hope the tutorial is helpful for you – feel free to post or email me with any questions you have, I’m here to help!
~Amy Sue
Hello Amy Sue,
I am diving into my first applique project and need needle size advise. I am going to put an owl, with normal thickness fabric, onto a sweatshirt, one that is not extremely thick, and was wondering what size sewing machine needle I would need to get the job done.
Thanks!
Stephanie
Hi Stephanie,
For an applique on a thinner sweatshirt I’d try either a standard size needle or maybe one “step” thinner/lighter. I’m not sure what the numbers would be for your particular needles, but my standard Schmetz is 80/12 and the one I use for applique on PUL is 70/10.
Good luck, and send photos of your owl when it’s done!
~Amy
Well, my stitching leaves something to be desired, but at least I was going for the rough look 🙂 Hope this link works. Thanks for the tips!
http://www.flickr.com/photos/52016979@N04/4996677607/
Stephanie
Stephanie,
It’ll get easier the more of them you do. 🙂
Unfortunately Facebook wouldn’t let me see your photo. I’ll bet it’s cute though!
~Amy Sue
/Users/Steph/Pictures/iPhoto Library/Modified/2010/Sep 16, 2010/DSCN1306.JPG
Maybe that will work?
Starting in on a pillow for a friend’s wedding!
Stephanie
What a thoughtful wedding gift! What are you appliqueing on the pillow?
~Amy Sue
Owls yet again for the pillow 🙂 Thanks again for the instructions!
http://i914.photobucket.com/albums/ac345/sturner8/Applique/DSCN1332.jpg
http://i914.photobucket.com/albums/ac345/sturner8/Applique/DSCN1306.jpg
Stephanie
Oh wow, those are gorgeous appliques! Fantastic work, Stephanie. I’ll bet the bride and groom will love them!
Thanks for sharing the photos!
~Amy Sue
hi amy sue … could you use applique for purses,bags ect?
Please reply bk…
PS: Love the instructions it makes it soooooo much easier for me!
Sure you could use applique on purses, bags, etc, especially if you’re making the purse or bag yourself. It’s possible to applique on ready-made bags, if they’ve got enough room to maneuver, but it’s a real pain. It’s much easier to do the applique on the pieces before you put the bag or purse together.
Good luck, and be sure to share photos!
~Amy Sue
Thanks for the info! I have been looking for a way to save the image from a relatively new t-shirt that was accidentally destroyed by bleach (image is unscathed, happily).
What I’d like to do is cut the image out in a nice big oval or rectangle (uncertain design yet) and applique it onto a new t-shirt or maybe a sweatshirt. The damaged t-shirt is standard cotton and has been washed.
1) Will this work?
2) Is there a way to make a super-frayed edge around the applique? I’ve seen this on some other shirts and sweatshirts and think it might fit the theme of this one (kind of relaxed camping vibe).
Thanks!!!
Jen,
That’ll work great!
If the t-shirt is knit it won’t fray, but the edges will curl. If you want a distressed look to the edges you could do a straight stitch 1/8-1/4″ from the edge instead of a satin stitch. The straight stitch will attach the image to the sweatshirt but leave the edges loose to curl as they will.
Woven fabrics (like a button-down shirt) fray easily so if you want frayed edges on a woven you can either do a straight stitch, or do a long zig-zag stitch. The straight stitch will fray more than the zig-zag, it all depends on what look you want.
I’d love to see a photo when it’s done!
~Amy
Hello Amy,
We are having a dilemma and are panicking. We have a fall festival this weekend and have got to complete about 18 shirts that we have appliqued using heat bond. We have two sewing machines and the same scenario applies to both machines.
when we sit down to sew on a scrap piece of material the machines sew perfectly. Then when we feel confident enough that we have the tension set correctly and begin sewing on the shirts for the festival the machines begin to skip stitches and and the thread begins the shred and ball up.
What baffles me is the fact that both machines (different name brands)are acting the same way. UGHHH!
It makes me wonder if the heat bond is old and is causing a sort of residue on the needle which in turn is sticking to the thread and making it skip and ball the thread. My Mother has “tweaked” the tension, changed out the needles, made sure the needles weren’t backwards, etc.
Do you possibly have any helpful suggestions that we could try? We are sooooo desperate!
Thanks in advance for your help,
Carey
Bryan, Texas
Carey,
Eeek, that is a panic-worthy dilemma! I have a couple of thoughts…
First, when you practice on the scraps, are the practice pieces exactly the same as the shirts? For instance, is the fabric Heat n Bonded to an extra shirt?
Second, what size needle are you using? Maybe trying a smaller needle will work better.
Third, what kind of thread are you using? I use Gutterman, which I was told produces far less lint than Coats and Clark. Maybe changing thread brands will help.
Last, are you trying to do a tight satin stitch? If your design will allow, you may have better luck with a looser zig-zag stitch. It won’t look as polished but the needle will go in and out of the fabric fewer times and hopefully not get gunked up.
I hope this helps – let me know how it goes!
~Amy Sue
Excellent, very detailed and love those useful pictures. Thanks for assisting me with my assignment (:
Miki,
Thanks for taking time to comment! I’m glad I could help you out – I’d love to see what you made, if you don’t mind sharing a photo.
~Amy Sue
Hi Amy,
This is a long shot, but I’m wondering about doing a kind of applique without any “fancy” stuff… I’m not in the US, so all I have is a needle, thread, and cotton woven fabric (or I have some wool felt I could use). I’ve looked for freezer paper but can’t find any (parchment paper? I have that…) So is it possible to do this without any interfacing, wonder under, Heat n Bond, or anything like that? What would I do?
Here’s hoping,
Becky
Becky,
Do you have a sewing machine? You can still applique without one but it’ll take a loooong time.
Here’s what I’d do if all I had was needle, thread and fabric:
– First cut out your applique shape: simple is definitely better in this case.
– If you have a washable glue stick I’d attach the applique to the backing fabric with the glue stick. If you don’t have a glue stick I’d pin it on well, then do a basting stitch all around the edges so it won’t shift on you. (A basting stitch is sewing up and down with long stitches along the edge.)
– Next you’ll have to do the satin stitch – this will take a while, depending on how closely you place the stitches. For a finished look like my appliques you’ll need to put the stitches right next to each other, but for a more “homespun” or “shabby chic” look you can space them out a little further. Stitch over all the raw edges of your applique so they don’t fray.
– Be sure to knot your thread on the back so all your hard work doesn’t unravel!
I hope this helps!
~Amy Sue
Wow, thank you so much! I just used your instructions to make a shirt for my one year old to wear at his birthday party. I read your page, followed the directions and about 20 minutes later, I had a super cute shirt with an appliqued one on it! Thank you for sharing such EASY to follow directions! 🙂
Laura,
Thanks for taking time to comment! I’m so very happy that my instructions helped you – that was my hope when I posted them. I’d love to see a photo of your little guy in his shirt, if you don’t mind sharing!
Have a great day,
~Amy Sue
Hi Amy,
Thanks so much for the explanation – it’s really clear.
I live outside the US and don’t have access to sewing supply shops. Is there anything that I can use instead of interfacing?
Thanks
Rachel,
I’ve never tried alternatives to interfacing, but I’ve heard of others who have used tissue or tracing paper. You could experiment with thinner papers that would tear away fairly easily. Sorry I don’t have any other suggestions for you.
I’m glad you were able to use the instructions though, and thanks for commenting!
~Amy Sue
I just did my first applique yesterday and loved it so much, I did two more things last night! I even made some fancy burp cloths for my friend’s surprise baby shower. I’d love to send you a picture, but didn’t know how. So, if you get a chance, come by my blog — norvellprogress.blogspot.com — to see it. Of course, it won’t be posted until after Sunday because that’s the baby shower. Don’t want to give any of the surprise away!!
Pingback: Appliqués: Decorative and Functional | Embrace the Penny
My solution for “needle boogers” is Frizz Eze hair serum, original formula. Yes, the same stuff I put on my out of control hair. It is silicone based, and doesn’t leave an oil stain on your fabric. It just takes a TINY bit, like touch the top of the bottle and run your finger up and down the needle a few times, then take a couple stitches through a piece of scrap before starting on your project.
Ann,
What a great idea! I’d never have thought to try hair products for sewing but I’ll definitely have to try it! Thanks for sharing your terrific tip.
And thanks for taking time to comment,
~Amy Sue
That’s great,
Thanks for the instruction, I will follow through.
Gregory,
Thanks for commenting! I’m happy my tutorial helped you. Please let me know how your appliques turned out!
~Amy Sue
Thanks a lot! I needed to make a poster about how to do applique for textiles at my school, and I used your pictures and steps, and I got an A*! Thank you! =)
Sarah,
Congrats! I’m glad I could help – thanks for letting me know.
Have a great day,
~Amy Sue
Hi I am in high school and we have a homework to write very simple instructions. Whats the method – something tack and something?!? I need it bad it. Its when you put the pins on then stitch?!? Please help me!
Charlie,
Is it “tack and stitch”? You pin two pieces of fabric together then stitch, removing the pins as you go?
The best way I’ve found to write directions for something is to actually DO it and take photos at each step. Then look at the photos and describe what you did, as if you’re telling someone who’s never done it before. Or pretend you’re telling a younger brother or sister how to do it – that helps keep the directions easy to follow.
Good luck, and feel free to contact me again if you need more help!
~Amy Sue
The drawing part leaves me confused. I always ponder on what to draw and if it will come out properly in the end.
However, was a brilliant step by step guide! 🙂
This is just what I was looking for! THANKS! I am wanting to start with doing letters to applique’ names onto my projects.
Do you use the Heat n Bond Lite? I was trying to decide between that and Wonder Under. And I noticed you also used stabilizer. I am hoping that will help it not to pucker. I think that just totally ruins the project when it does that.
I’m also wondering how you know what tension you need your machine set to. What should I look for? Will it pull or pucker? The directions for applique’ in my sewing manual is just a zig zag stitch, not a close satin stitch.
Thanks for the directions! I am really excited about learning how to do this!
Shay,
I use Wonder Under – the stuff that sticks so tight that you supposedly don’t have to sew it also. The stabilizer will help it not to pucker, and will help it go through the feed dogs (the little thingys under the presser foot that move the fabric forward) easier.
My machine sets tension automatically so I’m not sure what it’s at when I applique. Each machine is different though, so my numbers probably won’t help you anyway.
For satin stitch you’re looking for a tiny bit of the top thread to show up on the back – not quite even between the two threads – so you’ll want to loosen the top tension a little. If you put two different colored threads at top and in the bobbin it makes it easier to see what’s happening. If you can’t get a nice stitch that way then go for evenness between the two threads. What you don’t want is the bobbin thread showing up on top.
I started out with a machine that only did zig zag stitch and my appliques turned out nicely. They aren’t as “finished” looking as my current appliques, but part of that is because I’ve gotten better with practice, and part of it is that I didn’t have the stitch length very close when I was starting out.
Good luck, and please send me photos of your appliques!
~Amy Sue
Pingback: Soccer Appliqué Pillowcase
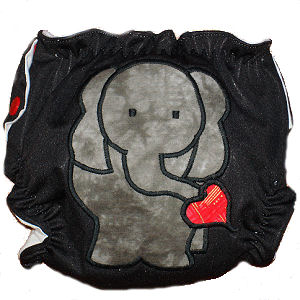
This may seem like a crazy question…but I don’t understand what to do next…it shows your elephant on white fabric…your background fabric? But the diaper isn’t white. I guess my question is…how did you sew the elephant to the diaper (or shirt, purse, etc.) Does this make sense? I understand all the other steps. I have never done this, I just started researching tonight. SO…that is why I have NO clue:) Thanks!
OK…I just went back a re-read everything and I get it now. Your elephant on the diaper was a DIFFERENT one than on the white fabric…right? hehehe…it is late. Thanks and I can’t wait to make something!
Julie,
You caught me! The elephant on the black diaper at the end was a different elephant. The light blue diaper I’d photographed for the tutorial was sent off to its new home before I remembered I hadn’t taken a photo of it when it was all done. Sorry for confusing you!
Thanks for commenting,
~Amy Sue
I have a few questions. Do u do the sewing before or after u do the iron on your diaper or a shirt. Not sure if u have ever made shirts but I am sure they are like diapers. Do u use the heat n bond lite or ultra. I have never done this before and want to try it and have been reading so many different things. Thanks hope to hear from u.
Amy,
I iron the appliqué to the item before I do any sewing. I’ve seen some appliqués that were all stitched except for the edges, and that would be much easier, but I feel that the appliqué is more securely attached with the extra stitching.
Good luck!
~Amy Sue
Heya! I understand this is sort of off-topic nevertheless I needed to ask. Does managing a well-established web site like yours take a massive amount work? Im brand new to running a weblog nevertheless I do write in my journal on a daily basis. Id like to start a weblog so I will probably be able to share my experience and feelings online. Please let me know if you’ve any kind of suggestions or tips for brand new aspiring blog owners. Appreciate it!
Hi,
It can take as much or as little work as you want it to. You can find some great free WordPress themes on the WordPress site, then it’s just a matter of minutes to get your blog set up and start writing. Or you can try to write your own theme, which I would imagine could take months – especially if you don’t know php coding like me. 😉
Some tips: Set your blog up on your own domain so you’ve got full control of it. Use a hosting company you can trust – I highly recommend Creo Communico; Michelle’s never, EVER let me down. Write about what you know, what you love, what you have passion for; that’s what’ll draw readers in.
Since you’re already in the habit of writing you’ve got a great start! Let me know when your blog is up and running so I can pop in and check it out. 🙂
~Amy Sue
Hi Amy Sue-question: I have a regular cotton t-shirt with a silk screen logo design on the front. I would like to cut the design out and put it on another t-shirt and thought that applique might be the way to go. I’m concerned working with a knit though. Any helpful hints?
Thanks.
Laurie,
Knits are difficult to work with because they stretch, and the edges curl and don’t lie down nicely when you’re sewing them. You may be able to pull it off if you iron some interfacing on the back of the design before you cut it out. Then put the Wonder Under right over the interfacing and continue as in the tutorial. Hopefully the interfacing will keep the edges stiff and prevent the knit from curling when you’re stitching it.
Good luck, let me know how it works out!
~Amy Sue
Thank you so much for this! I am a beginner (NOT an artist) and find that color pages make simple templates for applique. http://familyfun.go.com/printables/printable-paper-crafts/printable-templates-patterns/ That site has several free holiday (and other) templates perfect for applique and such. Question: can I use discarded paper backing from heat & bond as a stabilizer?? (like from larger projects?) or parchment paper?
Hi! I have reading your forum trying to find an answer to my problem, I can’t seem to find one and hope that you can help me. We have started doing embroidery work at our boutique and have a Brother PR-620. I recently did a bunch of appliques on sweatshirts. And after being worn or washed the fabric is coming apart from the stitching 🙁 Any ideas? Could it be the type or quality of fabric that I’m using??? Or something that I am doing wrong??? Any help is greatly appreciated. Thanks, Angie
Angie,
You’re saying that the appliqué fabric is coming apart from the appliqué stitching? Like it’s ripping through? If that’s the problem there could be a couple of reasons. First, cheaper fabrics have a rougher “weave” – meaning that they’ve got thicker threads and aren’t woven as tightly as more high quality fabrics, so they’re more likely to shred along the edges where they’re sewn. Another reason could be that your stitches aren’t wide enough to catch enough fabric and hold it in place, so it’s pulling out and the edges are fraying.
Are you using the fusible webbing to attach the fabric to the sweatshirt before sewing? That will help both problems because the fabric will be less likely to shift.
Another suggestion would be to wash the shirts inside-out on a gentle setting. But to be honest, I’ve never had any problem with my diapers that are laundered in hot water with a heavy duty cycle, so I doubt it’s the laundering that’s causing the problem.
Good luck, and let me know how things go!
~Amy Sue
Hi, Thank you soo much for posting this up on your fab website, you have helped me make a pillow, do my textiles homework and given me LOADS of inspiration!!! Carry on posting new things!!!
Emma,
Thank you so much for your kind words – they made me blush! I’m so very glad you’ve found my posts useful; helping others is one of my main goals for my blog!
I’d love to see a photo of your pillow, and anything else you’ve created – feel free to post links to your blog or email me photos anytime. 🙂
Thanks for commenting!
~Amy Sue
Hi Amy,
Thank you so much for this, I can appreciate the time it took to go step by step. My neice and I are half way through and she wanted me to say thanks “to the website owner” lol. SO thanks on behalf of Lea and Dakota!
Lea and Dakota,
I’m so glad my tutorial helped you! What a wonderful niece/aunt project – I’d love to see your finished appliqué.
Thanks for commenting!
~Amy Sue
hi,
i am making an applique for my school textiles project. I need to put it on a cushion. I dont have any interfacing, and dont really know how to use it?! will i be ok?
Rebecca xxx
Rebecca,
It’ll still work without interfacing, but it may not be as smooth and will be harder for you to work with. Try going for a “shabby chic” look – maybe use a zig zag stitch instead of a smooth satin stitch, or even a straight stitch 1/8″ inside the raw edge so it’ll ravel a little. That way any lumps or bumps will look (hopefully) like you meant it that way. 😉
~Amy Sue
Hi,
Thanks so much, i’ve got tezxtiles on monday so hopefully my cushion will look alright. I am doing applique flowers, but only two massive ones so it shouldnt take long. I shall use the “shabby Chic” look.
Rebecca
You’re welcome Rebecca – I hope you get a good grade!
Hi,
I’m 12 years old and I have to research and explain how to do applique for homework that is due in on Tuesday, 6th December. Some parts of the instructions I have found a bit confusing. What does it mean in the part where it says: ‘If there are sections next to each other, you need to decide which will go on top of the other. When tracing, extend the line of the bottom section about 1/4 inch where it touches the top one. This will allow you to layer the sections so there won’t be any gaps in between them.’ and ‘When the iron is hot, place the preshrunk fabric right (front) side down’ I’m sorry to be a nuisance but please could you reply by sunday 4th december. If you are reading this and if it is past then, don’t bother replying!! I wouldn’t want to waste your time!
Best wishes,
Chantelle
Hi Chantelle!
I’ll do my best to explain, but please let me know if you have any other questions, or if something I said wasn’t clear.
Let’s start by pretending you’re doing an applique of a tulip with 2 pieces: the stem and the flower.
“If there are sections next to each other, you need to decide which will go on top of the other.”
This means that you need to look at your applique for pieces that touch each other – like the top of the stem and the bottom of the flower.
When you have pieces next to each other you can’t make them exactly the same size as the pattern because when you put the pieces next to each other they could shift a bit and you’ll see space between them. It’s like if you were making it out of construction paper – it’s really hard to make the pieces fit exactly.
To keep from having space between the two pieces you need to layer one piece on top of the other – in this case the top of the stem would go under the bottom of the flower. Does this make sense so far?
“When tracing, extend the line of the bottom section about 1/4 inch where it touches the top one. This will allow you to layer the sections so there won’t be any gaps in between them.”
You could just move the stem up a bit to tuck the top under the flower, but that would make the whole stem a bit shorter than your pattern. That would be OK with our imaginary tulip, but when you’re working with lots of pieces it’ll mess everything up. The better way to do it is to make the top of the stem 1/4″ longer, then tuck that extra bit under the flower. That way you don’t have any spaces, and all the pieces are still the right size.
“When the iron is hot, place the preshrunk fabric right (front) side down”
When you’re sewing you need to wash and dry your fabric before you do anything else with it so it’ll shrink before you make your item. I forgot once and made a skirt that shrunk so much when I washed it that it didn’t fit anymore!
Fabric almost always has a “right” and “wrong” side. (Except some batiks, which look just as nice on both sides.) The right side is the side you look at – the outside – the wrong side is the back side, or the inside. Most of the time you can tell which is the right side just by looking at it – it’ll be the darker, fancier, or nicer side. If you can’t tell, ask the salespeople to tell you, then mark it so you don’t forget.
So, when the iron is hot, lay your fabric with the right side – the front – facing down, so you’re looking at the wrong – the back – side of the fabric. This way when you flip it over to iron on, the right side of the fabric will be up.
I hope this helped – please let me know if you have any other questions!
~Amy Sue
thank you so much, I understand it now. I really appreciate it!
Hi, I am so new to all of this, but I am having loads of fun trying.
Please help my daughter and her friends at college want there Business Fraternity letters appliqued on there tshirts. I tried on an old shirt and did not like how it washed up. PLEASE HELP! and of course they want them before Christmas break.
I forgot to tell you I am doing my appliques on a Brother embroidery machine.
Thanks again for you help.
Michelle,
I’m not familiar with Brother machines so I don’t know if or how that would make a difference.
What was wrong with the way it washed up? Did the appliqué shrink? Some amount of wrinkling is to be expected since it is fabric and not paint. LMK the problems with washing so I can help figure out how to fix it. 🙂
~Amy Sue
love you site…question about the New-Sew Heat and Bond…in the Red package…it insists on their website that you shouldn’t sew through it once it is ‘glued’ down with your applique…but I am hoping NOT to sew some of my more fussy-cut appliques ( hands with thin fingers) and then go ahead and satin stitch around other areas and thread paint…have you tried this with your appliques or have others tried with their quilt projects? Does your needle break? or get gooey?? Just want to anticipate what might happen if I try to use the heavier bonding H&B instead of the ‘lite’. Any suggestions? thanks tons. These are art quilt pieces I am doing…large project with lots of little pieces…hmmm?? Worried about needles and goo…?? Can’t understand their caution about not sewing?? any clues?
Barbara,
You are correct that No-Sew Heat and Bond says not to sew through it, but I was appliquéing on cloth diapers, which are laundered at high temperatures and on heavy-duty cycles, so I wanted to make sure the appliqués were well attached. My needle never broke, even through 2-3 layers, but it did get gooey. Generally a “booger” developed toward the top of the needle, which I just pulled off every so often. The needle itself didn’t get sticky though.
My mother has been an appliqué quilter for several years; I’ll ask her what she thinks about not sewing small pieces. Personally, I wash everything – even the quilts she made my children – so I like to have everything sewn down. But if you don’t plan for your quilts to be washed you may not need to sew them – I’ll ask her and get back to you. 🙂
~Amy Sue
what machine are you using? Your satin stitch (I assume is not a zig zag) is very nice
Mariella,
I’ve got a Viking, with a specific satin stitch for appliqué, but I used to do appliqué on a basic Kenmore with a zig zag stitch and it was nice too. If all you have is a zig zag stitch, loosen the top tension a bit so the threads go to the back a bit – it’ll look nicer.
Thanks for asking!
~Amy Sue
I must be the stupidest person in the world because I am about to try making applique letters and sewing them onto my girls dresses by hand. Lol. Also, my heatnbond paper did not come with directions. I didn’t even realize you were suppose to peel the paper off. I guess we all start somewhere. My Granny would be so ashamed! But maybe with your wonderful directions I will impress them all and most importantly have something sweet and handmade for my girls (2yo and 3yo). Thanks for the pics and well written directions! You have a new fan.
Dana Lee,
I don’t think it’s stupid; making appliqué by hand for your girls is a very loving gesture. I’d love to see a photo of your girls in their dresses when they’re done!
Thanks for commenting,
~Amy Sue
Thanks for the tutorial. This is well explained.
Your site here is Awesome!! My son wants a #14 NASCAR comforter which I thought I could make using your directions here. If I bought a comforter and used your directions including the sewing part do you think it would work, or would the thread go through both the front and the back of the comforter making it noticeable. I’m new at sewing, so any tips would be great!
Thanks!
Kelley
Kelly,
The thread would go through the whole comforter, to the bottom.
But if you can sew, you could make a comforter cover – I made one for College Boy when he was in 6th grade and it was super easy! Just get 2 flat sheets the same size. Appliqué one however you like, then put them right-sides together and sew around 3 sides, leaving the bottom side open. Because they’re sheets you don’t need to hem or anything! Turn right-sides-out and topstitch a couple of inches away from the seams – measure to make sure the comforter will fit inside. I used buttons and buttonholes to close the bottom of College Boy’s comforter cover, but you could sew on velcro, or snaps, or even a zipper if you want.
The cool thing about comforter covers is that you can change them cheaply and easily as your son’s interests change, and if they get dirty you can take the comforter out before washing them so they launder up more quickly.
Let me know what you decide to do, and I’d love to see a photo!
~Amy Sue
Pingback: Applique machines | Mortgageloanss
Hi Amy Sue,
So do you think a comforter cover is better than a comforter with the applique on top? I’m new to this sewing thing, but I’m anxious and eager to learn. Okay so I hear you saying put right sides together. Sorry I’m not sew savvy, so that means the wrong way or the right way. I’m going to assume the right way. So I’m assuming you’d do the first side with the applique first, and then sew the sheets to fit the comforter. Oops, I threw my son’s old comforter away. Maybe I can find a cheap one somewhere. Any tips would be great!!
Kelley
You rock! Thanks for posting this. It was a good confidence boost for me to get started on some pillows I’ve been chickening out about. Your detailed, step-by-step instructions are exactly what I needed!
Emily,
You’re welcome! Send me a photo of your pillows – I can’t wait to see how they turned out.
Thanks for commenting,
~Amy Sue
Thank you! I’ve been interested in learning applique, and this explains a lot. Thanks so much for sharing your knowledge!
Warm Regards, Barb
Barb,
You’re very welcome! I’m glad to know I’ve helped – have fun appliquéing!
Thanks for commenting,
~Amy Sue
Hi there! Do you know if they make any plugins to assist with Search Engine Optimization? I’m trying to get my blog to rank for some targeted keywords but I’m not seeing very good results. If you know of any please share. Thank you!
Awesome Dress Shirts,
I personally don’t use any SEO plugin because I prefer to do my own SEO, but you can find some by searching WordPress.org. I’ve heard good things about All in One SEO Pack, but have never used it personally.
A while ago I wrote a post about using SEO to improve your website’s rankings: “Blackhat Fish; 10 Tips to Promote your Site or Blog.”
Good luck, and thanks for commenting!
~Amy Sue
This is such a cute idea. My daughter’s birthday is coming up better get started making this. 🙂
After you put heat bond on your material how many day do I have to put it on my other material
Or do u put it on after you. Put on the heat bond.
Carol,
The heat n bond can wait almost forever! I’ve got scraps of fabric with heat n bond left from other projects and it still works, so there’s no rush to bond it to your main item.
Thanks for asking!
~Amy Sue
Pingback: Sewing machine applique – Sewing machine | Sewing » Blog Archive
We are in so much pain. We have two sewing machines and when we sit down to sew on a scrap piece of material the machines sew perfectly. Then when we feel confident enough that we have the tension set correctly and begin sewing on the shirts for the festival the machines begin to skip stitches and and the thread begins the shred and ball up.
What baffles me is the fact that both machines (different name brands)are acting the same way. UGHHH!
Hannah,
Oh my, that sounds frustrating! When you test on a scrap of fabric are you using the same fabric as your shirts? How many layers of fabric and fusible webbing do you have in the appliqués? You may need to try a ball point needle if you’re working on knits, or a heavier needle if you’ve got several layers of fabric in the applique.
I hope this helps!
~Amy Sue
Hi Amy,
I am a big fan of yours now. You explain the things in very easy manner and I love that. I have made kids pajama pants by reading your blog and it was so easy going. Now I’ll definitely try to applique as you have explained it very beautifully.
Thanks,
Alexandra
Alexandra,
Thanks for the compliment, I’m so glad my tutorials helped you! I’d love to see photos of the things you’ve made, if you’ve got time.
Thanks for commenting!
~Amy Sue
Hi Amy,
Thanks so much for this tutorial. I have a question about PUL w/ diapers- if I use ball point needles, then dry on hot won’t it seal up my stitching holes? Could you explain in more detail how you back your applique w/ PUL to make it waterproof? Thank you!
Karen
Karen,
When I first started making applique diapers I took a scrap piece of PUL, appliqued it, then washed and dried on hot to see if the needle holes sealed up. After several washes/dries they still hadn’t closed so I decided to add a second piece of PUL behind the applique to make it water proof.
What I do is cut a square of PUL long enough to cover the applique and wide enough to be caught in the leg seams. Then I pin it to the back of the diaper over the applique, shiny sides facing each other. When you sew the inner to the outer the top of the PUL square should be sewn all along the waist seam, and the corners of it should be caught in the leg seam. That should make the applique waterproof.
I hope this helps!
~Amy Sue
i would like to know how to put letters on sirts? do i used the wonder paper ot heat and bond?? i want to do i shirt for my daughter. or if i want to cuz a picture from a fabric and paste it on a shirt i don’t have a clue how to do it
To put letters on shirts I fuse heat and bond to the back of the fabric, then cut out the letters. You have to use pretty good-sized lettering, or the stitching will be really hard. To put a picture from fabric on a shirt, follow the same directions as in the applique tutorial, except you’ll only have 1 piece of fabric to worry about. Fuse it to the shirt, then stitch around the edges and you’re done!
I hope this helps!
~Amy Sue
Amy I love your site and blog, you’ve helped me so much. I only have Singer Sewing Machine Needles to Applique with, what size Singer needles would you suggest using? Thanks so much for all your help. Hugs Lee
Lee,
Thanks so much for the compliment – you made my day!
It’s been so long since I used my Singer machine I don’t remember what kind of needles I used, I just remember that they were color coded – love that! But according to this chart it looks like you’d want a MR12 Singer needle. If you have a sewing machine store in the area you could call them to see if they’d know.
I hope this helps!
~Amy Sue
Amy thanks so much. I don’t know if Walmart would carry them or not. I live in a very small town and there are not any sewing machine stores here so maybe I can look online??? Thank you so much for your help and replying to my question, you made my day & I love your site here and I will be back often to visit you and chat. I love crafting and love making things. Hugs, Lee
Lee,
Thanks again for asking and giving me the opportunity to help you! I’m sure you can find needles online – the only question is how much will shipping be. :p
Please do stop by often and leave a comment when you do; I love to hear from my readers!
~Amy Sue
Thank you for posting this up on your fab website, you have helped me make a kushen, Its do my homework and given me loads of inspiration. Carry on posting new things.
You’re very welcome! I’d love to see a photo of your final creation!
~Amy Sue
Hey Amy,
How are you?? I’m a great fan of yours. I have learned many things from you, indeed in that way you are my teacher. 🙂
Keep teaching me these wonderful things teacher.
Regards,
Amilie
Great, detailed advice, thank you! I’m going to applique tartan shapes onto tote bags for a craft fair next month 🙂
Love the useful pictures and article. I love the article is presented. i am very bad at drawing and stuff like that. My daughter has an assignment which is somewhat similar to this. This article has been very helpful to me. Thanks.
Hello. I forgot to remove the paper backing from my heat and bond and have already appliquéd. What if anything will happen when washed?
Thanks!
Janet,
It depends on how large your applique piece is. If it’s a smaller piece, like 1″ or less, you probably won’t have any problems, but if it’s a larger piece there coule be problems. The biggest problem is that the fabric isn’t attached to the backing in the middle so it could pull away and get puffy or otherwise wonky when it’s laundered. And since only the stitching is holding it down there’s a bigger chance of the fabric shredding or ripping by the applique stitching.
Depending on what the item is you may decide to let it go, or rip out the stitching and do it again. (It’s a PITB but may be worth it) If you do rip out the stitching you may need to trim the outer edge of the applique piece, depending on what it looks like when you’re done. Sometimes they come through just fine but sometimes the edges start to ravel and get ruffly. Pressing the applique piece may make things better, but be prepared to trim a bit off if needed.
Finally, if this piece is part of a design and not a stand-alone piece you may be better off ripping out the stitching and cutting a whole new piece instead of trying to salvage the old one. It all depends on what the item is and how “perfect” you want it to be.
Good luck!
~Amy Sue
Hiya! How would I go about sewing a lighter color onto a darker color? not wanting the darker color to show through?
would I cut 2 of the lighter color? I haven’t done enough applique to really know.. Thanks in advance!
Hi!
What I usually do is cut one of the lighter color and another from white fabric. Then use Wonder Under to fuse the white to the back of the lighter color, and from that point on continue as if they’re just 1 piece of fabric. Just be aware that it may be harder to stitch through in areas where other pieces are layered over or under the double piece.
Good luck!
~Amy Sue
My girlfriend loves your blog and she created appliques according to your instructions, they looks pretty. thank you.
Thanks Tony! I’m glad the directions were helpful and you like your girlfriend’s appliqués. I’d love to see them, if she wants to share photos. (hint-hint)
Thanks for commenting!
~Amy Sue
Pingback: How to Remove False Eyelashes – Eye Make Up Tips | how to remove
Fabulous tutorial!! Thanks for sharing 🙂
Hi Amy Sue- This is a great tutorial and I’m so impressed that you continue to respond to comments YEARS after its initial posting! I hope you can help me. I have some experience with appliques, most recently creating custom crests for hockey jerseys. My new challenge is putting a thickm, stiff, pre-made crest onto a soft, stretchy hoodie sweatshirt. The pre-made crest is composed of a heavy layer of iron-on adhesive and multiple layers of fabric, interfacing, and embroidery. I’ll really only need to stitch the outline- mainly a circle with the tip and blade of a hockey stick poking outside it’s rim. I have sewn this same crest onto hockey jerseys and after washing it is only slightly more flexible. Any experience with a large inflexible applique on a stretchy project? I have an old sweatshirt to do a trial on if I can find something to mimic the thick crest.
Thank you in advance!
~leeapeea
Pingback: Children’s Dresses, Soft And Thin, Machine Washable, Customized Colors – Wedding Gown Idea