Make a Natural Wood Teether
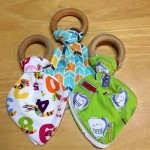
Ever since I changed my child care space to be more natural I’ve wanted to get some natural wood teethers. I browsed Etsy several times, but every time I started to click the Buy Now button a little voice in my head would scream “What are you doing, you crazy…