
I’m the kind of person who likes to make things herself. If I buy a handcrafted product I usually try to figure out how I can make it myself and how I can improve it. That’s actually how I got started in the cloth diaper business: I purchased some handmade cloth diapers and after inspecting them I thought “I can do this – better!” So I did.
That’s how I started to make mesh produce bags. One night at the grocery store I came to the horrifying realization that our reusable grocery bags were filled with plastic produce bags! How un-green is that? As soon as we got home I was on the internet researching reusable mesh produce bags.
There were tons and tons of mesh produce bags in different fabrics, sizes, with and without accessories. But I couldn’t bring myself to buy any; I looked at them and thought “I can do that – better!” So I did.
It took a little while. First I had to go through the painful “product development” stage where you try out different ideas and end up with a bunch of crap before you discover what works best.
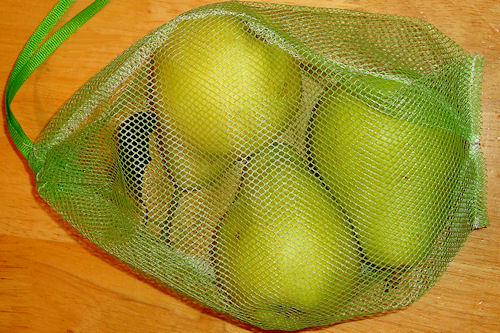
Finally I came up with what I think are the perfect mesh produce bags. They have that fantastic little pleat that I love in plastic produce bags, are lightweight, are see-through, and best of all – they’re reusable!
Supplies to Make a Mesh Produce Bag
In addition to the usual sewing implements; scissors, thread, pins, etc, you’ll also need:
- Scrubby mesh – don’t use regular tulle or petticoat mesh, they won’t hold up.
- 1/4″ ribbon – I prefer grosgrain, but you can use anything you have lying around.
- Medium-sized safety pin
- Iron and ironing board
- Sewing machine (Obvious I know, but I want to be thorough)
- Serger if you have one – if not you can zig-zag or overcast with your sewing machine.
Ready? Then let’s get started!
Make a Mesh Produce Bag – Step by Step
I did my best to explain each step clearly, and hope the photos help, but if you have any questions please contact me or leave a comment below; I’ll be happy to help!
Step 1: Cut your Mesh
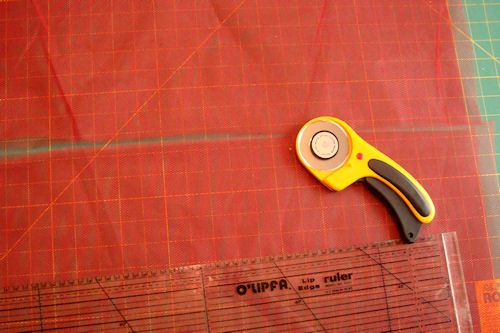
With the mesh folded in half, cut your rectangles so the fold is on the bottom. You can make your mesh produce bags any size you like, but keep in mind that after sewing the finished size will be about 1/2″ narrower across and 1″ shorter than you cut. Here are my cutting dimensions:
- Small: 7.5″ wide x 11″ tall (folded in half – if you unfold it the rectangle would be 7.5″ x 22″)
- Medium: 10.5″ wide x 12.5″ tall (unfolded: 10.5″ x 25″)
- Large: 13.5″ wide by 16″ tall (unfolded: 13.5″ x 32″)
I color-code my bags. Some of my rejects included cute little ribbons with snaps to wrap around rolled-up produce bags, and snap-on carrying pouches for neatly folded or rolled mesh bags. It didn’t take long before I realized that after shopping and putting away groceries I wasn’t about to sit and roll up all these mesh produce bags, or fold them neatly into a pouch. What I actually did was stuff all the produce bags into one of the large mesh produce bags and toss thems into the van with the reusable grocery bags. Color-coding make it easier to grab the right size while we’re shopping.
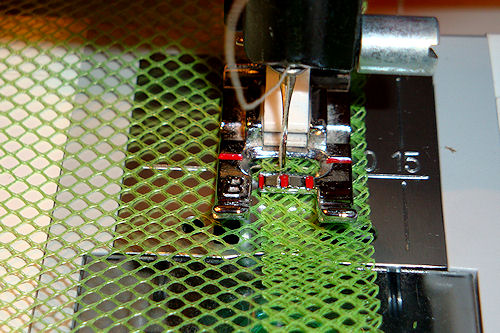
Step 2: Side Seams
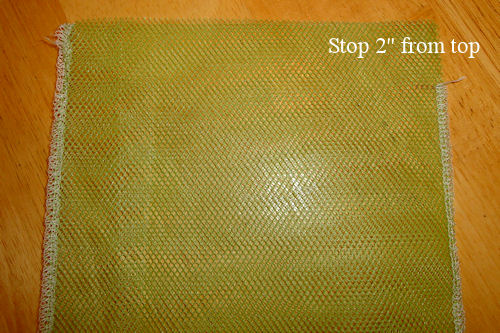
With the fold at the bottom of the bag, serge or stitch up the sides of the bag. Stitch top-to-bottom on one side, but on the other side stop about two inches from the top. This will make the opening for the ribbon closure. If you serged the seams you’ll need to keep this end from unraveling by tying the threads together, or whatever method you use. If you stitched the seams with a sewing machine you may want to zig-zag or overcast the seam for added strength.
That was easy, wasn’t it? Now turn the bag right-side-out.
Step 3: Top Casing
Before ironing your mesh take a scrap piece and do a test to make sure it doesn’t melt your mesh. Mine was fine, but I don’t want you to end up a melted mesh mess.
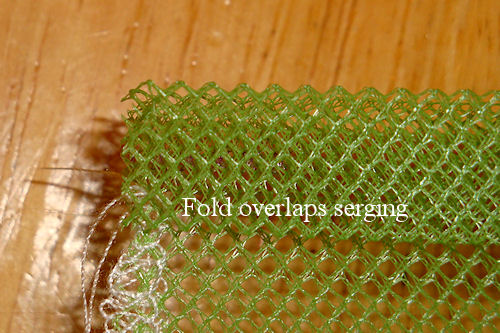
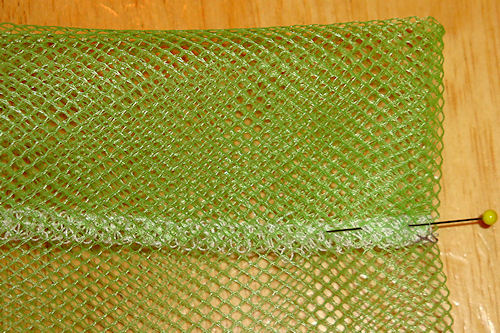
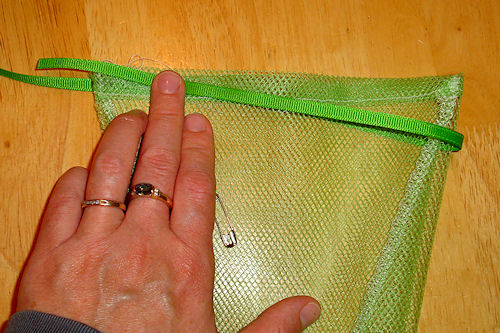
If your iron and mesh pass the test, carefully press the top edge under – to the inside – about 1/4″. Then fold that edge to the inside so it just barely overlaps the side serging/stitching. Pin in place then press the edge.
Carefully stitch along the fold to create a casing for the ribbon.
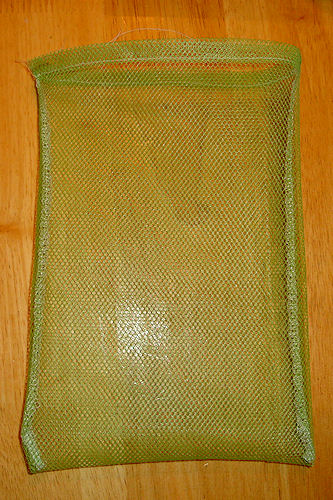
Good job! I’ll bet your bag looks something like this one!
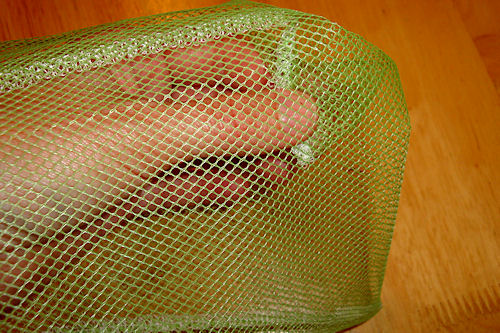
Step 4: Bottom Pleats
Most mesh produce bags on the market are simple rectangles like you’ve got now. If you want you could skip ahead to the last step and be done. Personally, I like the bottom pleats because they expand to hold more produce, they allow the bag to sit upright, and they pull the sides of the empty produce bag in so it’s smaller.
To add the pleats you first have to mark bottom fold in the middle. The easiest way to do this is to fold the bag in half side-to-side and make a mark there.
Keeping the back right-side-in, push one corner toward the middle mark, so the seam is directly under the mark. It’s a little tricky, but I know you can do it.
Pin the pleat in place.
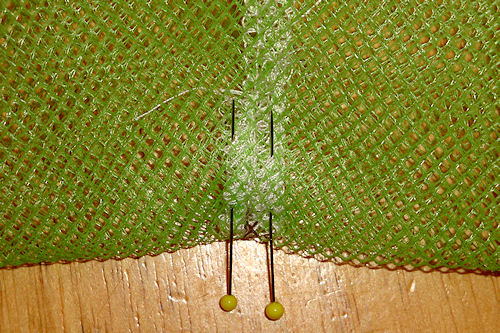
Then repeat with the other side so both pleats are pinned in place.
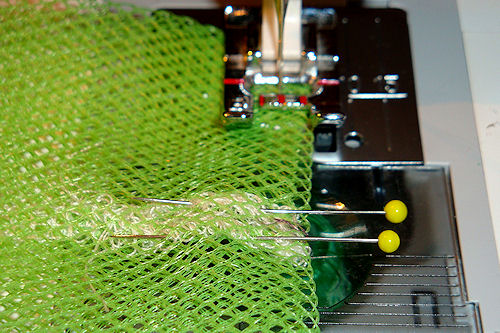
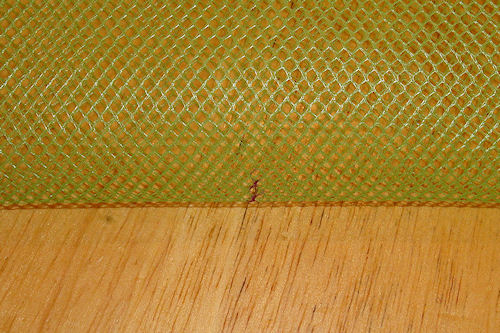
On the right side of the bag, stitch across the bottom about 1/4″ from the fold, catching both pleats in the stitching. Piece of cake!
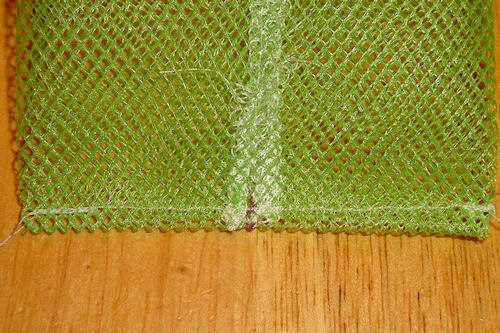
Yours looks like this, right?
You’re almost done – just one more step.
Step 5: Adding the Ribbon Closure
Measure your ribbon against the bag. You need enough to go around the whole top of the bag plus about 2-3″ on both ends for tying.
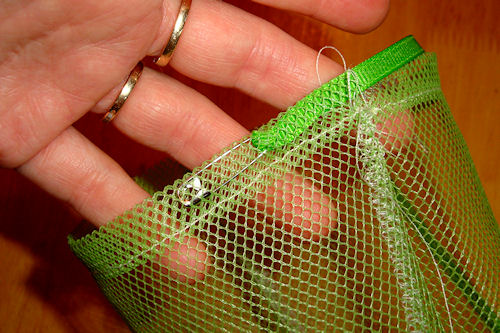
Attach the safety pin to one end of the ribbon and insert it in the opening of the casing. Carefully work the safety pin through the casing until it comes out the other opening. Be careful not to pull the other end of the ribbon into the casing. If you do it’s not the end of the world, just pull it all the way through and try again.
Hold the ends together and tie them together. You can cut the ends on the bias (slanty) so they’re less likely to unravel.
Step 6: Done!

To finish my bags I like to lay them out on the ironing board and give them a light pressing to set the pleats and make them nice and flat. You can totally skip this step if you want though.
Using your Mesh Produce Bag
Fill your mesh produce with fresh fruits or veggies and pull the ribbon tight. The grosgrain ribbon has always held well for me, but satin ribbon might slip. You can also tie the ribbon after you pull it tight: just fold it so the knot is against the bag, creating two loops on either side. Take those two loops and tie them into a knot. Pretty slick!
When my mesh produce bags get a little dirty I just swish them through the water when I’m washing dishes and air dry. If they get really nasty I wash them with my laundry on cold then air dry.
Congratulations, you just made a mesh produce bag! Go show everyone you know what a cool produce bag you made, then take a photo and send it to me so I can see too. Go green with mesh produce bags!


After searching the internet for an hour, I’ve decided that yours is the nicest, best explained, and best photographed tutorial on making reusable produce bags. Thanks so much for sharing!
I love the look of the mesh you used, but even though I frequent my local fabric store way too much, I am not acquainted with “scrubby mesh.” What is it and where can I find some?
Cynthia,
Thanks for the compliment!
I get my scrubby mesh from Joanne’s – I can’t remember if that’s the actual name or not. They usually have it somewhere near the tulle but usually I have to dig to find it. Hopefully the salesclerks in your Joann’s will know what it is if you ask – at ours it’s a tossup whether they’ll know something or not.
Good luck!
~Amy Sue
I have been scouring the net for a tutorial on how to make a Mesh Bag, and while your tutorials are excellent, i don’t want to use ready-made fabric mesh. I want to make my mesh. Could you help me? Thank you very much in advance.
Hazel,
Thanks for taking time to comment! I’m glad my tutorial was helpful to you. 🙂 I don’t crochet but I’ve seen tutorials and patterns for crocheted mesh bags – maybe you could do a search for one of those? Otherwise I’m not sure how you’d make fabric mesh. Maybe there’s a tutorial for that out there somewhere?? Let me know if you find one!
~Amy Sue
I have done these using two ribbons, one at each side. The bags stay closed much better. Joan
Joan,
Thanks for your comment! The first tester bags I made had two ribbons until I ran out of ribbon with several bags yet to finish. I did the last few with just one ribbon and they work just as well as the ones with two ribbons – I’m just careful to pull the ribbon tight.
I’d love to see photos of your bags, if you’re up to sharing!
~Amy Sue
Thanks for the tutorial! I just linked to it on my blog about my consumer habits. I hope it’s not spammy to include the link: http://www.whatibought.blogspot.com
Laura,
You’re very welcome, thanks for linking to it!
~Amy Sue
Thanks for the tutorial. Definitely the best one I’ve seen in my search. Can’t wait to make them for me, family, and friends!
April,
Thanks for commenting – I’m glad you found the tutorial helpful! Send me a photo when yours are done, I’d love to see them!
~Amy Sue
Thank you so much for this awesome tutorial!! It was so easy to follow, and my bags came out great! I could only find white mesh, and I used white thread, so the seams are almost invisible! I love it!
Stacy,
I’m so happy my tutorial helped you! Send me a photo of your bags, I’d love to see them!
I personally like white mesh the best – it just seems so fresh and clean I want to put my food in it. Since I’m visual I use red and green mesh to help distinguish sizes, and since they’re “food colors” they’re OK but I can’t get into black, turquoise or hot pink mesh for produce – it just seems wrong to me!
Thanks for commenting,
~Amy Sue
Very nice tutorial! Great detail, I love it.
But what really amazes me is that every single time I go in (google)search of other bloggers green tutorials to try out I always find you! This is actually the 6th time it’s happened. And every time your tutorials are so well put together and detailed. Seriously, I think you rock.
Amber,
I’m SO glad my tutorials are helpful to you! That’s the main reason why I post them – to help people out.
And thanks so much for the compliment; you seriously made my day!
~Amy Sue
Thanks so much for the tutorial. I used your template with a few modifications to make my own bags. I tied a small loop of elastic into the edge of the bag to wrap around the folded/rolled up bag to store it in my purse, and I color coded the ribbons by bag size.
Alyssa,
What a clever idea! I especially love the color-coding, I color-code EVERYTHING! I’d love to see photos of your bags – pretty please?
Thanks for sharing your idea!
~Amy Sue
Thanks so much for posting this tutorial Amy Sue! I live in Toronto and I tried to find “Scrubby Mesh” at our local fabric store and they don’t seem to carry it… Do you know if there’s any other alternatives or if any one know what the actual name is for the mesh?
THANK YOU!!!!
Joanna,
You can get scrubbie mesh online from Joanns.com. As far as a second choice from your local fabric store, I’m not sure what to recommend. Tulle might work but isn’t as strong as the scrubby mesh. Organza may also work, but will be more expensive.
The best thing to do is see what you can find that’s close to the scrubbie mesh and get a little of it to try. You might find something you like better!
Good luck, and thanks for commenting!
~ Amy Sue
I wonder if there is a source for “scrubby mesh” made from recycled materials? otherwise, I’m not sure I’d feel comfortable using another plastic. Every time you purchase a new plastic item (even yardage), more is made to replace it. How many of these would you use? At my store it’s the norm to not put anything in produce bags unless they are small, like apricots, or brussels sprouts, for example. I’m not sure they would need to be mesh in cases like that. Does anyone else have a different experience?
Jacki,
I’m sure you could use other fabrics instead of mesh to make the bags – I’ve got some muslin ones, but you can’t see through them. Maybe organza? Around here the norm is plastic produce bags so I figure one small step is better than nothing.
Thanks for commenting!
~Amy Sue
I just got back from JoAnn’s & bought nylon netting. I hope this is the right stuff because when I went to the cutting table the employee said that it was a fun color for making scrubbies.
Brandy,
It sounds like you’ve got the right stuff; I first heard of it from people who used it to make scrubbies. 😉
I’d love to see your finished mesh produce bags, if you’ve got time to send me a photo.
Have fun, and thanks for commenting!
~Amy Sue
I used your pattern to make some out of the mesh from a former mosquito/bug tent. I washed it beforehand so I think/hope it’ll be okay. Only made one so far, but the pleats definitely make it look better than other patterns I’d seen. Thanks so much!
Erin,
Thanks for the compliment! Obviously, I like the pleats too.
I’d love to see a photo of yours when you get a chance… and let me know how the mosquito/bug tent fabric works. What a great way to recycle/upcycle!
Thanks for commenting,
~Amy Sue
Hi Amy Sue,
I finally got around to taking a picture of my mosquito netting bags. I pinned it on Pinterest, and embedded your website into the picture, too. I’ve also bought more material to make them out of curtain sheers. We’ll see how that goes! Meanwhile, everyone who’s seen them loves them.
http://pinterest.com/pin/177540410280190973/
Erin
Erin,
Thanks for sharing your photos! I looked them up at Pinterest, and you have a new follower now. 😉
Let me know how the mosquito netting holds up, and how curtain sheers work. So far the scrubby mesh has survived pretty much everything except pineapple spines. Oops!
~Amy Sue
Pingback: Life before the MQG. . . » The Quilt Engineer
I have purchased several yards of white mesh fabric to use for a lacrosse goal, but it was not strong enough for this use. Can I use this fabric for the bags you describe? They look easy enough, but is there a special needle/thread to use for this fabric on the sewing machine? Sewing by hand is very tedious. Thanks for your great site!
Maureen,
I’m not sure exactly what kind of mesh you’re talking about, but since you already own it you may as well try it! I don’t think there’s any special needle or thread you need to sew it, but you may need to experiment with different stitch lengths to see what works best for you. Sewing by hand is definitely tedious!
Good luck, and let me know how your mesh works!
~Amy Sue
Thanks for this. I live in Australia and my shop has plastic produce bags that are made in the USA. Two levels of wrong for trying to be green.
Cynthia (first commenter) said it all and said it right the first time: nicest, best explained and best photographed. Thank you very much for the Tutorial. It’s taken me a while to get here, but really appreciate the time, effort and thoroughness of your Tutorial. Many thanks!
Excellent tutorial, Thank you very much.
I have made 9 “stuff sacks” from an old tent that the sticks broke -including one for a sleeping bag. I really want to make some mesh bags from the tent screen so I can see the contents. I like the idea of using color coded ribbons. I really like your colorful bags the best. So now I have to go get some of the “scrubby mesh” I plan to make several. Thank you again.
I made small bag using mesh from tent. I am happy with the it for small utensils for camping. I will be getting the “scrubby mesh” for heavy use.
What a great way to reuse an old tent. Thanks for the idea, Candy!
And thanks for commenting too,
~Amy Sue
I don’t want to be a party pooper but I’m going to throw in there that choice of material also contributes to the label “green”. Polyester and acrylic fibers are listed in the US “Toxic Substances Control Act”. They are considered inert until they come into contact with the digestive or respiratory tract. This means inhaling or ingesting even a few small fibers. Vinyl contains lead (some manufacturers have begun leaving out the lead but not many).
The manufacture of these products is 100% toxic to workers and the air and water surrounding the factories. These fibers are made from highly toxic oil waste petrochemicals.
I am all for reuse and that includes reuse of plastic fabrics. I just wanted to put it out there that anything made for food storage should be 100% food safe. Polyester fiber is not food safe. Vinyl is not food safe. According to the USDA, even the plastic produce bags aren’t food safe, so go figure.
Just another vote for using a natural cotton, hemp, flax (linen), or wool fiber. Thanks for letting me rant. I just really want people to know so we can all make informed choices.
Pingback: Week 18: Self-made produce bags | The Un-Fuck Up This World Experiment
Pingback: Produce Bags | 40k Today
Were are you buying scrubby mesh?
Hi Sheryl,
My local JoAnns Fabrics used to have it, but I haven’t purchased any in a while. I haven’t used up the TON I bought last time, LOL!
~Amy Sue
This bag looks so amazing. Even using homemade products we can make this wonderful bag at home. It helps to make fruits fresh and longlasting. Will try to make it for my home. Thanks for the idea!